Using Ansible & Netbox to build datacenters
The most tedious and unpleasant task in building a network, is the management of IP addresses and subnets and ensuring that the work done in the design phase is properly carried over into the live router configurations.
One of the worst ways to go about this, is to ensure that all of your design and configuration is spread across as many disparate systems as possible. Put all your IP subnetting and VLANs in Excel spreadsheets and then manually type in every part of your router configuration while looking at excel spreadsheets. As a bonus, make sure that your cabling data is also in Excel, in another spreadsheet and is constantly being updated with new versions and e-mailed to the datacenter operations team with formats like CABLING_FINAL_v12.xls
If this doesn’t sound appealing to you (and it shouldn’t), there is a more sane way to design your network, in a way that you will be able to have all the information accessible in one location, and have network automation that pulls from this central source and builds router configs without manual intervention.
NetBox
NetBox is a web application for data center infrastructure management, and is used to track all assets in the datacenter, both physical (racks, servers, power) and logical (ip addresses, prefixes, vlans).
By using NetBox, you can quickly organize and manage all the information in one location, and with NetBox’s REST API you can query the information back out and use it to configure your devices.
When used by large teams that manage different types of devices, the real value of using NetBox is that teams that manage different parts of the datacenter can share information that is required by both teams, in a central location, and tooling can be written to pull this information from NetBox and program devices.
The team that plans your network and configures the routers and switches can place the information about the VLANs, subnets, and IP address assignments in NetBox, and the teams that manage the servers that are attached to those network devices can quickly pull this information and configure their devices.
This workflow, as I’ve described, isn’t a workflow that only NetBox can provide. This whole workflow can be done via a big spreadsheet (and believe me, it has), but the point of NetBox is that it has an API and good data structures that can be used to design a datacenter floor, instead of having to come up with these conventions and formats in your excel spreadsheet and getting everyone to input the data correctly.
Ansible
If the idea of having a central location for all the datacenter information doesn’t get you out of bed in the morning, or the sense that everything has been put away neatly in the right place doesn’t help you get to bed at night, there are other reasons why you should design your datacenter using NetBox.
Automation.
One of the most tedious and hair-pulling parts of building a new deployment has to be the part where you take the network that you have designed on paper and make it work for real.
You may have just been given excel spreadsheets containing the list of IP addresses, VLANs, and then the cabling list of what attaches to what, and then be told to make it all work.
Weeks of hair-pulling ensue, where you might find mistakes in the paper design, have to issue corrections, e-mail corrected spreadsheets to all the other teams that are part of the project, and pray that the datacenter floor staff plugged everything in correctly.
Or, you could use Ansible and NetBox and make things less stressful.
Let’s take a simple example where you are trying to set up four new spines switches, in preparation for a new deployment of servers in multiple racks.
You will need to cable these switches together, plan the IP addresses and IP prefix that will be used to connect these spines in a full mesh, so all the devices that attach to each spine can communicate.
Using Ansible, you can create all the cabling information in NetBox.
p2p_prefix: 2001:DB8:1:1::/64

cables:

  - a_device: clab-ipamexample-spine1
    a_name: e1-2
    b_device: clab-ipamexample-spine2
    b_name: e1-1

  - a_device: clab-ipamexample-spine1
    a_name: e1-3
    b_device: clab-ipamexample-spine3
    b_name: e1-1
Using this cabling information, I create a set of IPv6 prefixes for each connection, for each router that is being configured.
- name: Create p2p prefix
netbox_prefix:
data:
family: 6
prefix: "{{ p2p_prefix }}"
site: fake-site
- name: Set a fact for the total number of routers we have
set_fact:
router_count: "{{ groups['srl'] | length }}"
- set_fact:
conn_count: "{{ router_count | int * (router_count | int - 1)//2 }}"
- name: Allocate /127s from p2p prefix
netbox_prefix:
data:
family: 6
prefix: "{{ p2p_prefix | ansible.utils.ipsubnet(127, item) }}"
site: fake-site
# Create the number of prefixes equal to the number of connections in the mesh
# via the formula N(N-1)/2
loop: "{{ range(0, conn_count | int) | list }}"
- name: Assign IPs to each cable endpoint from each /127
netbox_ip_address:
data:
# Take the 0-based loop index, divide and round down, to get the
# nth /127 subnet in the p2p prefix. We divide and round down because
# we are looping through the cable array twice, once for the A side
# and once for the B side of the connection, and we need both sides to be in
# the same subnet
prefix: "{{ p2p_prefix | ansible.utils.ipsubnet(127, (ansible_loop.index0 //2)) }}"
# Request that NetBox find an available IP address in the prefix and
# assign it to the interface
assigned_object:
# If the index0 of this loop is an even number (or the first), grab the
# A side of the connection, otherwise grab the B side of the connection
device: "{{ cables[ansible_loop.index0 // 2].b_device if ansible_loop.index0 % 2 else cables[ansible_loop.index0 // 2].a_device }}"
name: "{{ cables[ansible_loop.index0 // 2].b_name if ansible_loop.index0 % 2 else cables[ansible_loop.index0 // 2].a_name }}"
# Loop through the total number of connections we have,
# but have two iterations for each connection
loop: "{{ range(0, conn_count | int * 2 )| list }}"
# Use the extended loop control feature so that ansible_loop.index0 is available
loop_control:
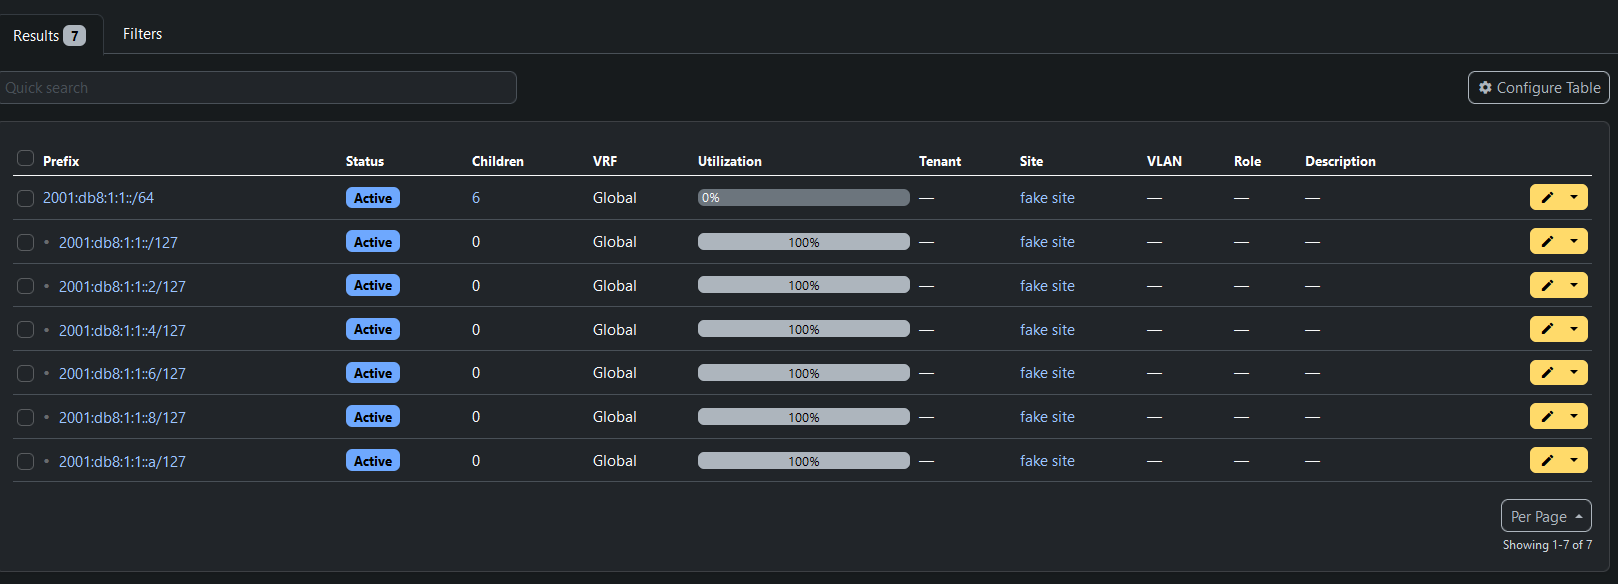
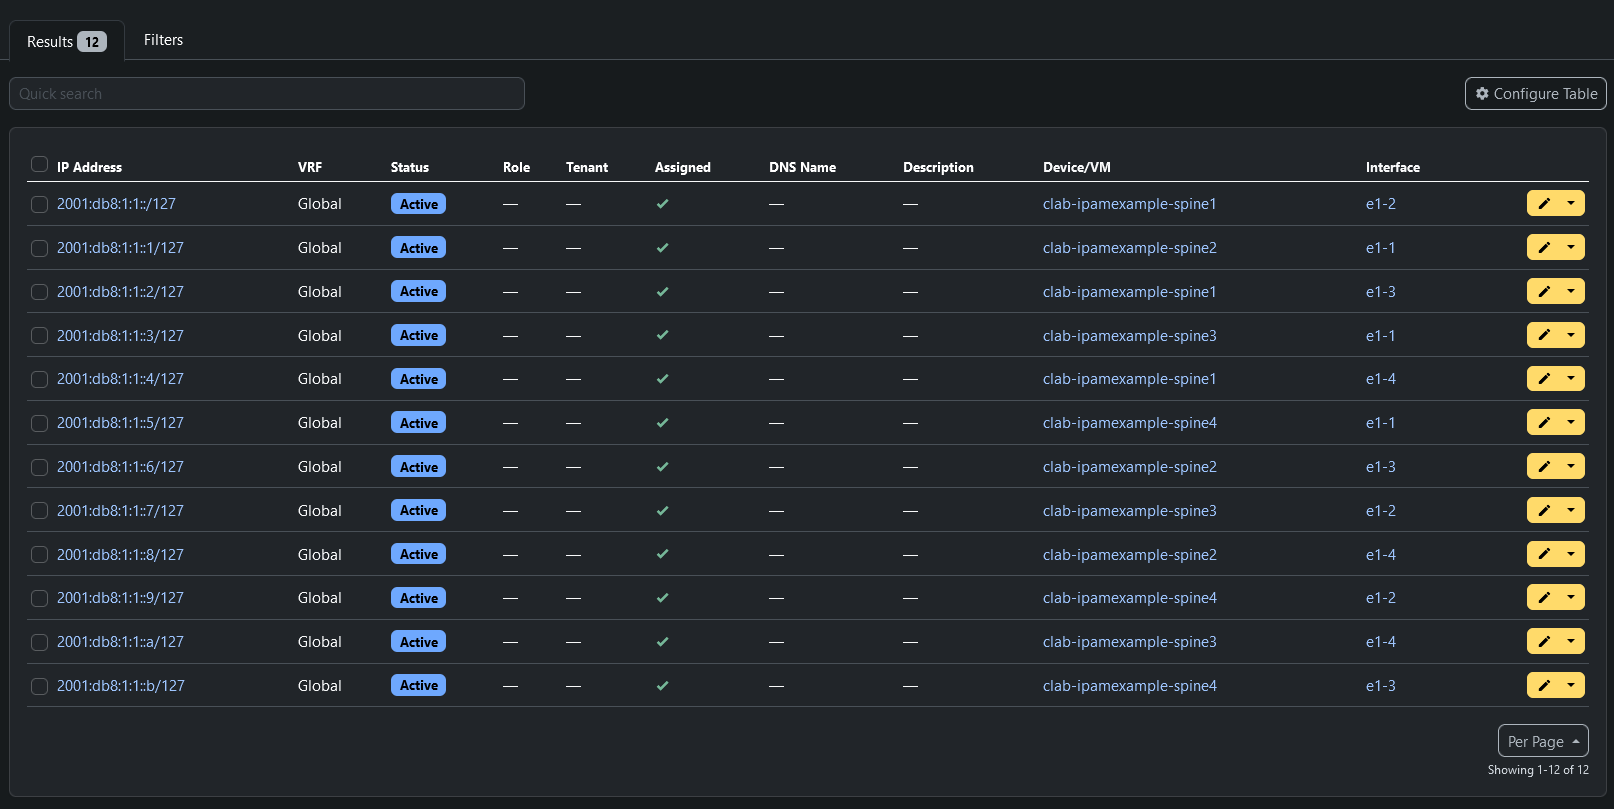
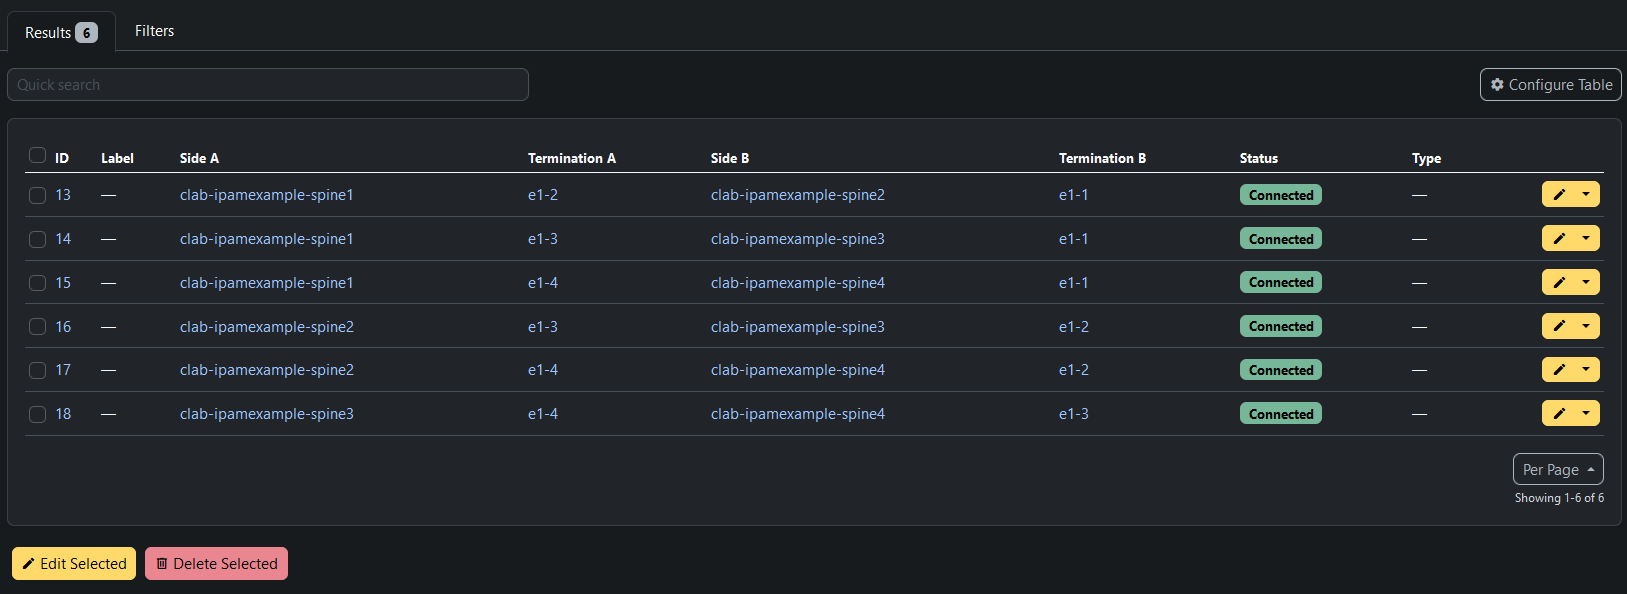
extended: trueThis creates the following IP prefixes,IP address assignments, and cables in NetBox:
The advantage of this workflow is that everything gets updated in NetBox, and in a subsequent blog post I will document the next step of the process, where you pull information out of NetBox and program BGP and routing on the devices.